
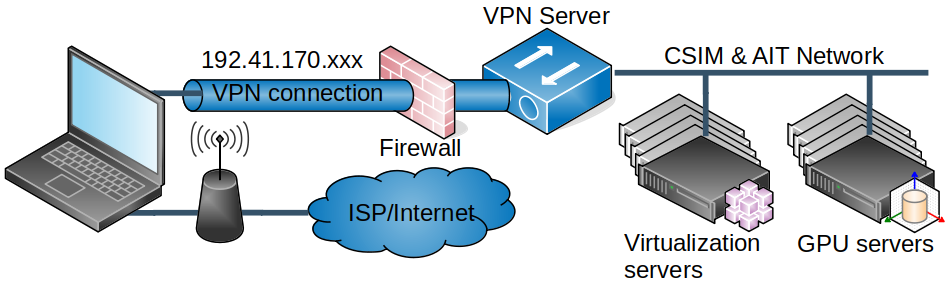
Our VPN (Virtual Private Network) allows a simple access to facilities that normally cannot be accessed outside of CSIM (except by using a SSH tunnel). Facilities with restricted access can be for example the virtual servers or the GPU servers, the printers, the file server...
Our VPN is not behaving like commercial ones, it does not proxy all your connections through CSIM: only your traffic to and from CSIM is going through the VPN. The rest of the traffic is going though your ISP as it would normally doing with the VPN, your computer can be seen as being part of CSIM network, wherever you are located in the world.
On Linux systems, access to AIT resources will also be covered by our VPN, just like if you were connected inside CSIM building (Windows clients have the same access but need to add a route manually as described in step 10.).
Authentication to CSIM VPN
Authentication is base on your user's credential (username and password provided at CSIM) and a VPN certificate file.
The VPN certificate file is personal and encrypted with a password. It should be a password different from your user's password. The VPN certificate file provides another layer or security, beyond the standard username and password.
Once it has been created and encrypted, there is no way to recover the password used to encrypt the VPN certificate file.
You are only allowed to have one device connected to CSIM VPN at any time.
Create your VPN certificate file
Go to your account management page to create and download your VPN certificate file.
| The VPN section is located right below the section where you can change your password. You must enter the password used to ecnrypt your VPN certificate, then press the Create button.Note: once your certificate has been created, it is valid for one year, if you forget your VPN encryption password, you need to contact an adminstrator to revoke your current certificate before you can generate a new one. |
 |
Once it has been created, you can download your VPN certificate at any further time. Just click on the Download button.You can download the certificate as often as you wish, if new functionalities have been added to the VPN, tey will be included the next time you download your certificate. The VPN certificate file is called CSIM-<your_username>.ovpnYou can install that VPN certificate file on any device you will use to connect to CSIM VPN. |
 |
Revoke a certificate
You can contact the laboratory supoervisor if you want to revoke your certificate before the expiry date.
Install, configure and run OpenVPN on Windows
This has been tested on Windows 7.
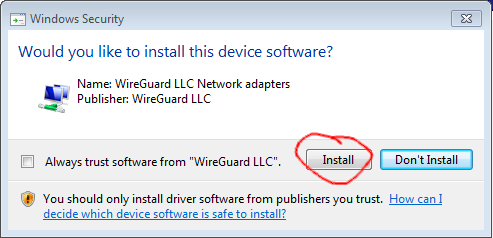
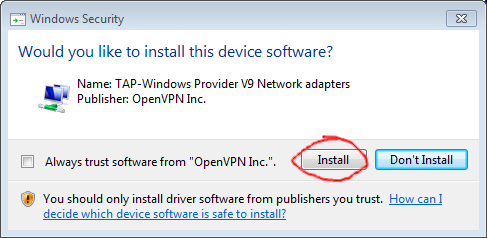
| 1. | Download OpenVPN from the community page. Install the application normally. Accept to install WireGuard LLC Network Adapter and Tap-Windows Provider V9 Network adapters, they are essential components to run OpenVPN on Windows. |
  |
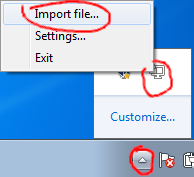
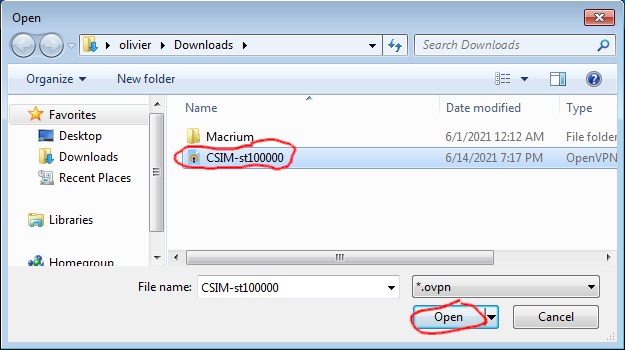
| 2. | Right-click on the icon for OpenVPN Import file.Note: next operations with OpenVPN will always be done with a right-click on the icon. |
 |
| 3. | Select the proper VPN certificate file, with the name CSIM-<your_username>.ovpnThe VPN certificate files are saved in C:\Users\your_username\OpenVPN\configYou can install more than one certificate file, but there is no mechanism provided to remove a file apart from going and manually removing it in Windows Explorer. |
 |
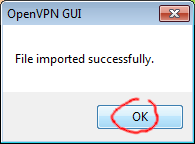
| 4. | OpenVPN is configured and ready to use. Click on OK to continue. |
 |
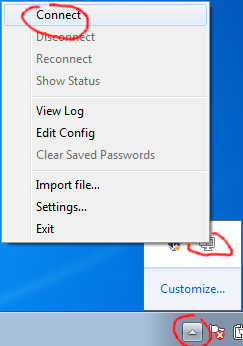
| 5. | Right-click on OpenVPN hidden icon and select Connect to start a VPN connection to CSIM. |
 |
| 6. | Enter your username and password. You must use the credential of CSIM. And click OK. |
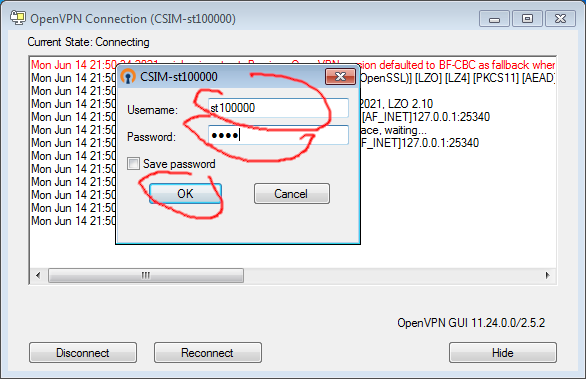 |
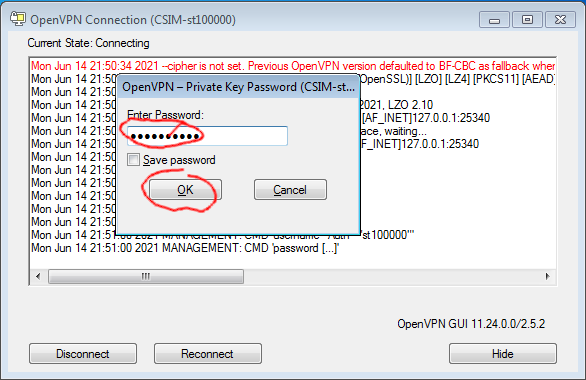
| 7. | Next setp is to enter the encryption password used for the VPN certificate file. When you click on OK, the connection will be established with CSIM VPN. |
 |
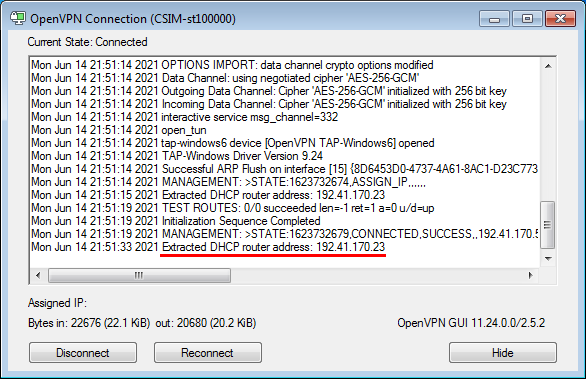
| 8. | When the status window of OpenVPN displays the message Extracted DHCP router address: 192.41.170.23 the connection has been completed.The status window will hide automatically. Note: the hidden icon for OpenVPN has changed to a green colour |
 |
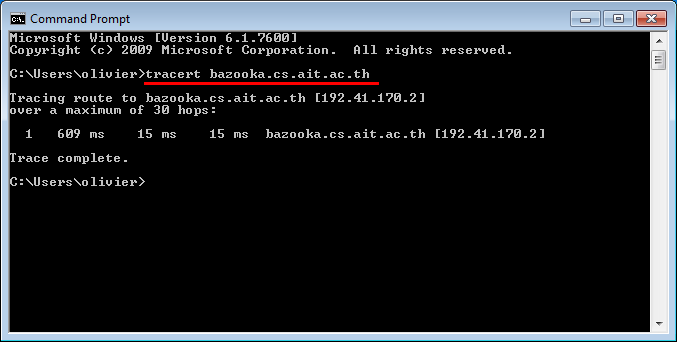
| 9. | You can run a tracert to any machine in CSIM, it should show a single hop.That means that your computer is now connected inside CSIM. |
 |
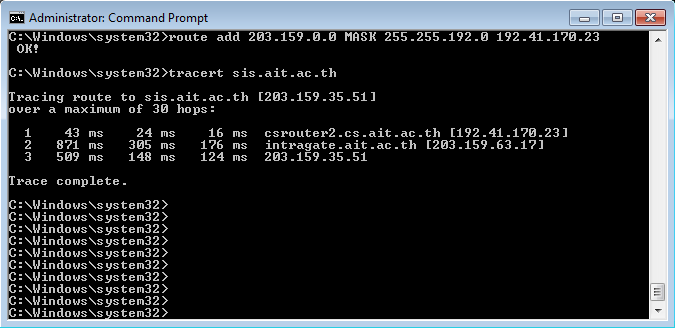
| 10. | You can manually add a route to AIT network Open a command prompt with administrator privileges (Start, All Programs, Accessories, Right click on Command Prompt, Run as Administrator); Enter the following command: route add 203.159.0.0 MASK 255.255.192.0 192.41.170.23 The screenshot show what result you expect. |
 |
Install, configure and run OpenVPN on Linux
This has been tested on Ubuntu 20.04 and 22.04.
CSIM VPN is not supported by Ubuntu native VPN client. This is likely due to the fact that we manage dynamic IP addresses for the clients in a different sever than the OpenVPN server.
But the OpenVPN client is readily available. In case you are using a Linux distribution that does not include OpenVPN, you can download it from OpenVPN Community pages.
You must start with creating or downloading the following script (lets call it up.sh). This script will create the needed routing through the VPN. This script has been tested on Ubuntu 20.04 and 22.04. Note that unlike for Windows, you get a connection to CSIM and AIT networks.
#!/bin/sh
# Test if a route exists to the VPN server
route_exist=`ip route show 192.41.170.56`
if [ "XX$route_exist" != "XX" ]; then
logger -p user.info -t openvpn.up Deleting existing route to VPN server
ip route del 192.41.170.56
fi
# Set a route to the VPN server using the default route, as resolved by
# the existing routing table
ip route add to `ip route get 192.41.170.56|cut -d' ' -f 1-3|sed '/^ *$/d'`
logger -p user.info -t openvpn.up Route to VPN server has been added
# DHCP address can only be obtained after the VPN connection had fully
# initialized. Run DHCP in a separate and detached process.
(while :
# loop indefinitely until we get a dynamic IP
do
dhclient $1
ret=$?
if [ $ret -eq 0 ] ; then
# dhclient will sometime resolve to some private IP coming from
|
Make sure the script is executable:
chmod 755 up.sh
|
The installation is now complete, you can start using OpenVPN.
You launch OpenVPN with the command:
sudo openvpn --config <VPN_certificate_file> --up <path_to>/up.sh --script-security 2
|
You may want to save that command in a script. OpenVPN will ask for your username and password, as well as the password used for encrypting the VPN certificate file. You must use sudo because you need super-user privileges to establish the VPN connection.
The connection has been established when you receive the message Extracted DHCP router address: 192.41.170.23.
You can verify that you are connected to CSIM VPN with a traceroute:
olivier@olivier:~$ traceroute bazooka.cs.ait.ac.th
traceroute to bazooka.cs.ait.ac.th (192.41.170.2), 64 hops max
  1   192.41.170.2  19,085ms  18,883ms  18,648ms
olivier@olivier:~$ traceroute intranet.ait.ac.th
traceroute to intranet.ait.ac.th (203.159.12.4), 64 hops max
  1   192.41.170.23  19,833ms  18,579ms  18,623ms
  2   203.159.63.17  20,375ms  21,593ms  20,212ms
  3   203.159.12.4  18,663ms  19,672ms  18,717ms
olivier@olivier:~$ netstat -r
Kernel IP routing table
Destination     Gateway         Genmask         Flags   MSS Window  irtt Iface
default         _gateway        0.0.0.0         UG        0 0          0 wlo1
link-local      0.0.0.0         255.255.0.0     U         0 0          0 wlo1
192.41.170.0    0.0.0.0         255.255.255.0   U         0 0          0 tap0
vpn.cs.ait.ac.t _gateway        255.255.255.255 UGH       0 0          0 wlo1
192.168.0.0     0.0.0.0         255.255.255.0   U         0 0          0 wlo1
203.159.0.0     csrouter2.cs.ai 255.255.192.0   UG        0 0          0 tap0
olivier@olivier:~$
|
On the traceroute samples, you can see that CSIM servers can be reached in a single hop, like for any client inside CSIM network. The same is true for AIT servers that are reached in three hops (see the lines that have the interface tap0).
Install, configure and run on Mac (Apple Silicon M1 up)
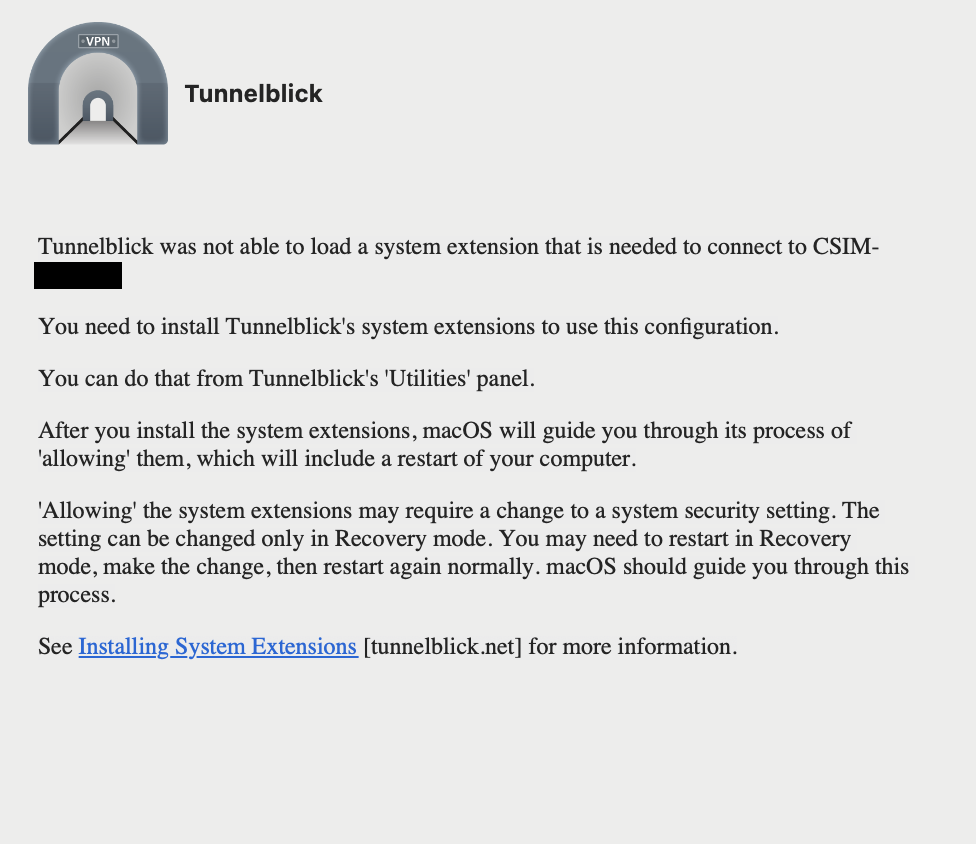
1) use Tunnelblick (NOT OpenVPN app) install lated version.
2) Then open config file .ovpn with Tunnelblick software.
3) Install System Extensions (https://tunnelblick.net/cKextsInstallation.html#m1-big-sur) (it will need to change startup option)
P.S. you can just use ssh via bazooka for ssh server inside CSIM Network.
| Powered by: |