December 2013 Archives
Mon Dec 16 15:44:21 ICT 2013
rsync(1) configuration
Typical rsync (1) configuration file on the server is located in /usr/local/etc/rsynchd.conf and should have a section of the form:
[section]
	path = /directory
	auth users = username
	secrets file = /usr/local/etc/rsyncd.secrets
	uid = 0
	gid = 0
	hosts allow = 192.41.170.22
	host deny = 0.0.0.0/0
The rsyncd.secrets file contains the username:password used by the client to connect to the server. It must be chmod 600.
On the client the user username must launch the synchronization with the rsync (1) command:
rsync -aczHAX --delete --password-file=passwd_file server::section /directory
Fri Dec 13 11:42:06 ICT 2013
fusefs port in FreeBSD
To allow ordinary users to mount fuse devices, set the kernel state:
# sysctl vfs.usermount=1
Now fuse filesystems (sysutils/fusefs-x) can be munted at startup from /etc/fstab with ethe late parameter.
You may need to create a symbolic link for /usr/sbin/mount_fusefs is it was not created when installing the port.
Fri Dec 13 11:32:20 ICT 2013
Dependencies for vmware-vsphere-cli port on FreBSD
In order to build and install net/vmware-vsphere-cli you need the following ports installed first:
- compat6x
- glib
- gettext
- perl (install)
Fri Dec 13 11:24:58 ICT 2013
UTF-8 encoding in Ruby Gems RDoc port in FreBSD
When installing Ruby Gems RDoc port on FreeBSD, there is a conflict between UTF-8 and ASCII coding.
To remove the conflict, add the environment variable: RDOCOPT --encoding=UTF-8
Wed Dec 11 15:51:12 ICT 2013
The /usr/local/ETC directory to build the port for asciidoc(1)
When installing asciidoc(1) on FreeBSD, the port is looking for the directory /usr/local/ETC. I create a symbolic link with /usr/local/etc/asciidoc:
ln -s /usr/local/etc/asciidoc /usr/local/ETC
Wed Dec 11 15:28:12 ICT 2013
Disable lock screen and password change in Windows XP
Student should not be allowed to lock the machines in the laboratory. This prevents them to prepend a machine and prevent access to other fellow students.
In a similar way, the password change menu should be disabled to encourage students using the web page for account management.
Use the Groupd Policiy Editor to disable both functions on Windows XP, follow the step-by-step instructions bellow:
- Run gpedit from command line, press Windows-R and type gpedic.msc.
- in the left pane, select User Configuration/Administrative Templates/System/Ctrl+Alt+Del Options.
- Change the options for Remove Lock Computer and Remove Password Change in the right pane.
Wed Dec 11 14:53:43 ICT 2013
Mount a file system image in FreeBSD
A filesystem have been saved in an image file, this image can be mounted in FreeBSD like any other filesystem.
More information is available in FreeBSD Handbook, in the section Network, Memory and File Backed File System.
- The first step is to configure and enable a memory disk associated to the image file; the memory disk has a device of the form /dev/md0 or /dev/md0s1c:
# mdconfig -a -t vnode -f filename
- The device can now be mounted like any other device:
# mount -t type memory-disk-device mount-point
- To have the list of available memory disks:
# mdconfig -l
- After umounting the memory disk, you can remove it with:
# mdconfig -d -u memory-disk-ID
Tue Dec 10 12:16:37 ICT 2013
Install and configure Mac OS X system on iMac
- Insert the Mac OS X Install DVD in the drive.
- Hold the ALT key for 10-20 seconds while booting; until an arrow appears on the screen.
- Select the DVD icon.
- Proceed with accepting any menu until the Install Mac OS X screen.
- The first step of to reformat the hard disk. On the Install Mac OS X screen, select Utilities/Disk Utility.
- Select Machintosh HD and Erase.
- Go on and erase, this will apply the default format operation which is a quick format.
- Exit Disk Utility. The disk has been reformatted.
- Continue with installation and accept all the defaults.
- Select country Thailand.
- Select Keyboard US.
- Select No information transfer.
- Do not enter Apple ID.
- Do not enter Registration Information.
- Create the user toor, full name Charlie, with the Administrator password use on Windows machines.
- Install the applications from Applications Install DVD.
- Cancel Keyboard Setup Assistant.
- This step will configure the login options. Go to System Preferences/Accounts/Login Options.
- Select Automatic Login: off.
- Select Display login window as: Name and password.
- Now you need to install AIT root CA certificate. Open a shell
window and create the directory that will hold the root CA:
# sudo mkdir -p /usr/local/ssl/ca
- Import the certificate from banyan.cs.ait.ac.th:
# scp on@banyan:SSL/ca/ca-bundle.crt .
- In the Finder, open ca-bundle.crt.
- Add it in the Keychain system, always trust it.
- Move the certificate to its final location:
# sudo mv ca-bundle.crt /usr/local/ssl/ca
- Next step will be to download and install system updates. Launch Safari.
- Modify the preference to use www.cs.ait.ac.th for home page.
- Authenticate to access to Internet.
- In the Finder, launch Software Update.
- Restart at step 26. and relaunch the Software Update until there is no more update (minimum twice).
- Configure syslog to log to CSIM loggin server. Edit
/etc/syslog.conf add a line:
*.* @sysl.cs.ait.ac.th
- Configure NFS to autiomatically mount the disk from oak.cs.ait.ac.th/etc/auto_master, comment out all lines except /net and /Network/Servers.
- Edit /etc/fstab and enter the line:
oak.cs.ait.ac.th:/home /home nfs -P,-i,-b 0 0
- Add an entry to start fstab automatically:
# scp on@banyan:_Library_LaunchDaemon_fstab.plist to /Library/LaunchDaemon/fstab.plist
- Now configure the date and time. In System Preferences/Date & Time/Date & Time, set Set date and time automatically to: ntp.cs.ait.ac.th.
- In Clock, select Use 24-hour clock.
- In System Preferences/Sharing, change the Computer Name. The name are in the form of Macx.
- Install the C-shell .rc file:
# scp on@banyan:/etc/.cshrc /etc/.cshrc
- Configure LDAP and the users accounts. Edit /etc/openldap/ldap.conf and add the line:
TLS_CACERT /usr/local/ss/ca/ca-bundle.crt
- In System Preferences/Account/Login Options, click on Network Account Server Join...
- Enter the name ldap.cs.ait.ac.th and click Open Directory Utility.
- Edit LDAPv3.
- Click New and enter Server Name or IP Address: ldap.cs.ait.ac.th.
- Select Encrypt using SSL.
- Click on Continue.
- Enter in Pick a Template: RFC 2307 (Unix).
- Enter in Searchbase: ou=csim,dc=cs,dc=ait,dc=ac,dc=th.
- Click Continue then OK.
- Lock the Directory Utility.
- Enter CSIM in Configuration Name.
- Click Edit, in Search & Mappings.
- Click Groups and change Search base to: ou=Group,ou=csim,dc=cs,dc=ait,dc=ac,dc=th.
- Change Search only at the first level.
- Click People and change Search base to: ou=People,ou=csim,dc=cs,dc=ait,dc=ac,dc=th.
- Change Search only at the first level.
- Expand People, under RealName, add gecos and delete cn.
- Under RecordName add uid.
- Click on Users and change Search base to: ou=People,ou=csim,dc=cs,dc=ait,dc=ac,dc=th.
- Change Search only at the first level.
- Expand Users.
- Repeat the changes for RealName.
- OK everything and close
- In a shell window, make the users tempadmin and on administrators of the machine:
# dscl . -append /Groups/admin GroupMembership on tempadmin
- Configure the printers. Edit /etc/hosts.lpd on banyan. Add a line with the full name of the iMac computer macx.desktops.cs.ait.ac.th. Restart the lpd(8) daemon:
# /etc/rc.d/lpd restart
- In System Preferences/Printers & Fax:
- Add Address: banyan.cs.ait.ac.th
- Queue: big
- Name: Big
- Print Using Print software
- Select HP Laserjet 4300 Series
- Select Optional Tray3: 500 sheets
- Select Duplex Unit selected
- Select Fit to Page: Nearest Size and Scale
- Same for Queue: magnum; Name: Magnum; select HP Laserjet P4010 series.
- Same for Queue: Ricoh; Name: Ricoh; select Ricoh Aficio 2051 -Gutenprint v5.2.3; this one has no option to select duplex or tray.
- Lock the System Preferences.
- Reboot
Mon Dec 9 18:02:05 ICT 2013
Re-install grub after WEA lab has installed their sandbox Ubuntu
Part of WEA class is installing Ubuntu on the machines in the lab. During the process, the students will install their own version of grub.
To have the machines boot normally, you must re-install a stanard version of grub.
- Choose CSIM Ubuntu from grub. The name may vary, the version number will be different, but it should be on /dev/sda3.
- Mount the WEA sandbox Ubuntu:
# mount /dev/sda5 /mnt
- Open /mnt/boot/grub/grub.conf in a text editor:
# edit /mnt/boot/grub/grub.conf
- Locate the first menuentry and copy it to the clipboard.
- Open /boot/grub/grub.cfg in a text editor:
# edit /boot/grub/grub.cfg
- Locate the entry for Windows.
- After the entry for Windows, paste the contents of the clipboard from point 4 above.
- In the entry you just pasted, change the label to WEA Ubuntu 13.4 (on /dev/sda5).
- Re-install grub:
# grub-install --nofloppy /dev/sda5
- Reboot.
Mon Dec 9 15:35:41 ICT 2013
Enable syslog on VMware ESXi server
- Remote connect to ESXi with ssh(1):
# ssh root@ESXi
- Enable syslog in ESXi firewall:
# esxcli network firewall ruleset set --ruleset-id=syslog --enabled=true
# esxcli network firewall refresh
- Define the syslog server; you must use an IP address, not the server's name:
# esxcli system syslog config set --loghost='udp://192.41.170.20:514'
# esxcli system syslog reload
- Check the configuration:
# esxcli system syslog config get
   Default Network Retry Timeout: 180
   Local Log Output: /scratch/log
   Local Log Output Is Configured: false
   Local Log Output Is Persistent: true
   Local Logging Default Rotation Size: 1024
   Local Logging Default Rotations: 8
   Log To Unique Subdirectory: false
   Remote Host: udp://192.41.170.20:514
Wed Dec 4 20:00:39 ICT 2013
FreeBSD portupgrade
# portupgrade -fa -x bsdpan\*On the mail server, you want to ignore Kaspersky anti-virus:
# portupgrade -fa -x bsdpan\* kav4\*
Wed Dec 4 17:19:15 ICT 2013
VMware administrator
To have administrator priviledges on a VMware ESXi server (ESXi), a user must be listed in the Domain Admins group on the Active Directory server (AD).
To list the users of the group Domain Admins, execute the following command on the AD:
# samba-tool group listmembers "Domain Admins"To add a user to the group Domain Admins, execute the following command on the AD:
# samba-tool group addmembers "Domain Admins" user_name
Note: it may be possible that a user has to be re-added to the group after the account has been disabled and then re-enabled.
To grant administrator priviledges on an ESXi to the AD group Domain Admins, use the following procedure.
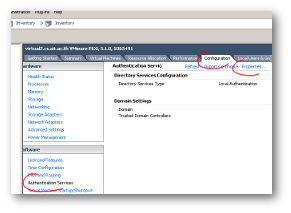
- Connect to the ESXi using the VMware vSphere standalone
client. Authenticate with the root account.
Select the Configuration tab, the Authentication Services item and click on Properties....
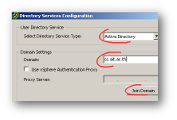
- In the popup window, select Active Directory, enter the
Domain cs.ait.ac.th and click on Join Domain.
- In authentitcation window, enter the User Name Administrator and the Unix root password. Click on Join Domain.
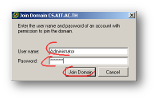 Now the ESXi can access the accounts defined in the AD.
- Select the tab Permissions, right click on the window and select Add Permission...

- In the popup window, select the Assigned Role Administrator and click on Add...
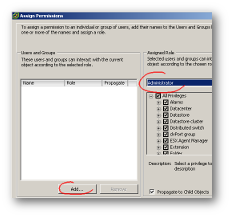
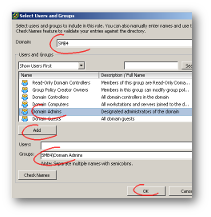
- In configuration window, select the Domain SMB4, in the
Users and Groups select the group Domain Admins and click on
Add.
SMB4\Domain Admins is now listed in the Groups, click on OK.
All the users listed in the group Domain Admins of the AD have Administrator priviledges on the ESXi.
Wed Dec 4 17:07:26 ICT 2013
ClamAV
After upgrading ClamAV, ownership must be fixed on /var/run/clamav and /var/log/clamav:
# chown vscan:vscan /var/run/clamav
# chown vscan:vscan /var/log/clamav
Tue Dec 3 12:00:57 ICT 2013
Amanda
To restore files from amanda, login to amanda server, get root and change directory to /holding/recover. You can then issue the command:
# amrecover normal -t localhost -s localhost -oauth=bsd
When upgrading Amanda, do all the clients first, and only then do the server.