
- Details
- Category: Uncategorised
Policy: Firewall and Network Access for Physical and Virtual Machines (VMs)
To maintain the security and integrity of the CSIM Network, all physical machines and Virtual Machines (VMs) must adhere to the following firewall and connectivity guidelines. These measures are in place to prevent network breaches and ensure the CSIM network is not used as a source for external attacks.
1. Classroom VM Restrictions
For all instructional and classroom-related VMs, inbound and outbound traffic is restricted as follows:
-
Web Traffic: Only HTTP and HTTPS protocols are permitted.
-
SSH Access: Direct SSH access to classroom servers from external networks is prohibited. Users must first connect to the CSIM gateway/jump host before initiating an SSH session to the server.
2. Prohibited Services and Ports
To protect the network from being used as a routing source for attacks or unauthorized tunneling, the following services are strictly prohibited from running or opening ports:
-
Email Servers (SMTP/IMAP/POP3)
-
Remote Desktop Protocol (RDP)
-
VPN Services
-
Tunneling Protocols (SSH Tunneling, GRE, etc.)
3. SSH Connectivity Rules
-
Internal Only: SSH access is only permitted within the AIT Subnet.
-
External Access: Any SSH connection originating from outside the AIT network must use the designated CSIM access points (VPN or Jump Server) as per department security protocols.
4. Internet Egress (Outbound Access)
Servers and VMs generally do not require direct, unrestricted internet access. To ensure monitored and secure updates:
-
All outbound internet traffic must be routed through the CSIM Proxy Server.
-
Proxy URL:
http://squid.cs.ait.ac.th:3128
5. Compliance and Requests
Failure to comply with these settings may result in the immediate suspension of the VM or network port. If your specific project requires an exception to this policy, a formal justification must be sent to the CSIM IT Administration for review.
Mr.Jirapas Sangsue | Lab Supervisor
Email:
- Details
- Category: Uncategorised
You can print on many printers around the campus if you install the special software that works with Ricoh printers.
There are printers available at Admissions, AIT Center reception, AIT IS, EEM room w127, Energy room 204, AIT Extension, HR, ISE, Library, OFAM, Purchasing, SET room n230, TC, WEM room w203, Yunus center, and others.
Not all printers are accessible to everyone, not all printers are accessible 24/7, Library ones are available at the Library opening hours.
Before you use any of the printers, you need to configure the software. Once the printer is configured, it will be working when you are connected in CSIM or anywhere in AIT.
For Linux and MacOS, see at the bottom of this page.
Installing the software on Windows 11(updated 3 Mar 26)
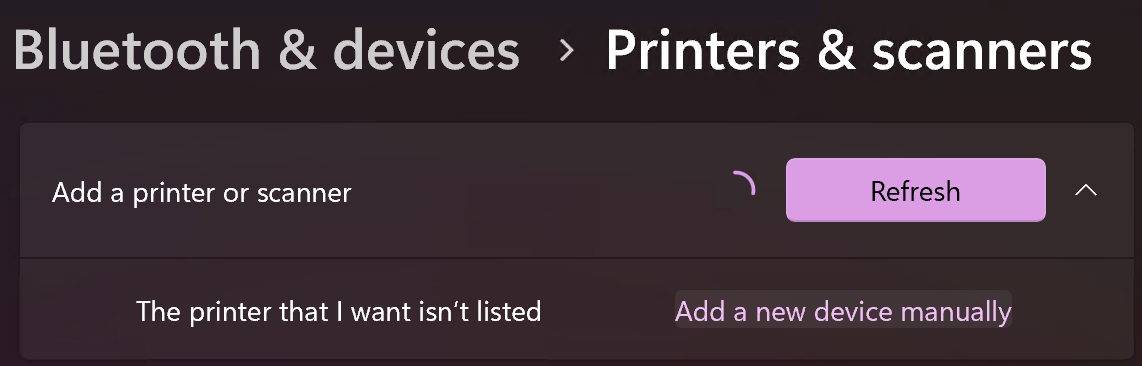
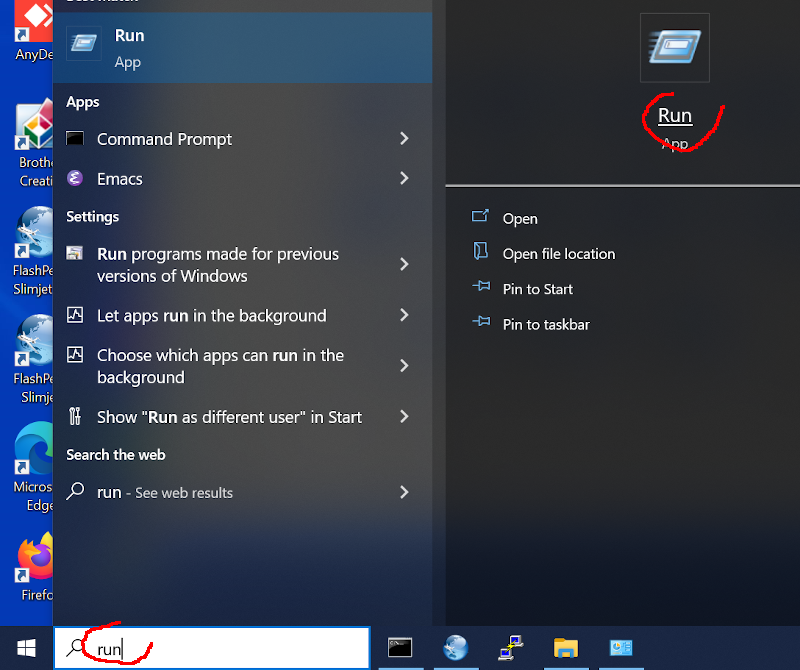
1. Open Printers & Scanners from windows search.
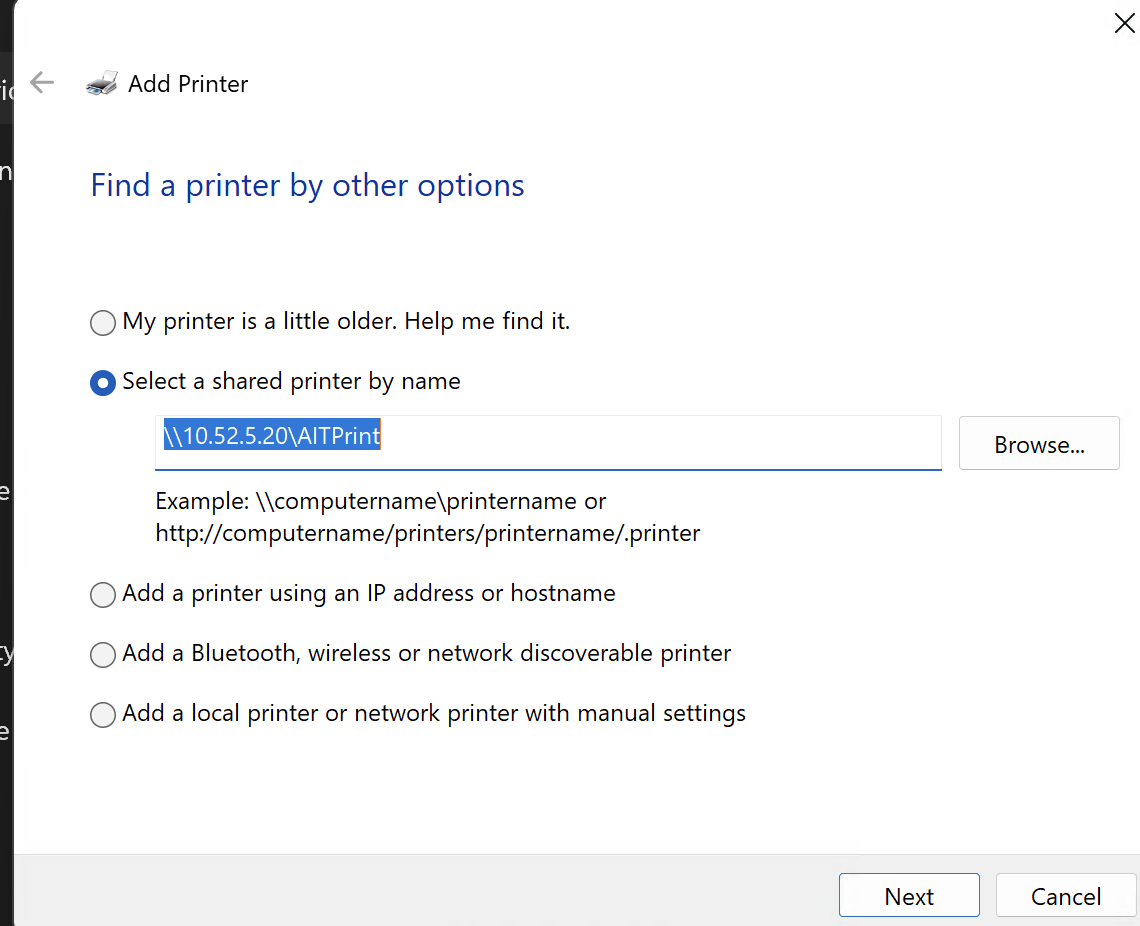
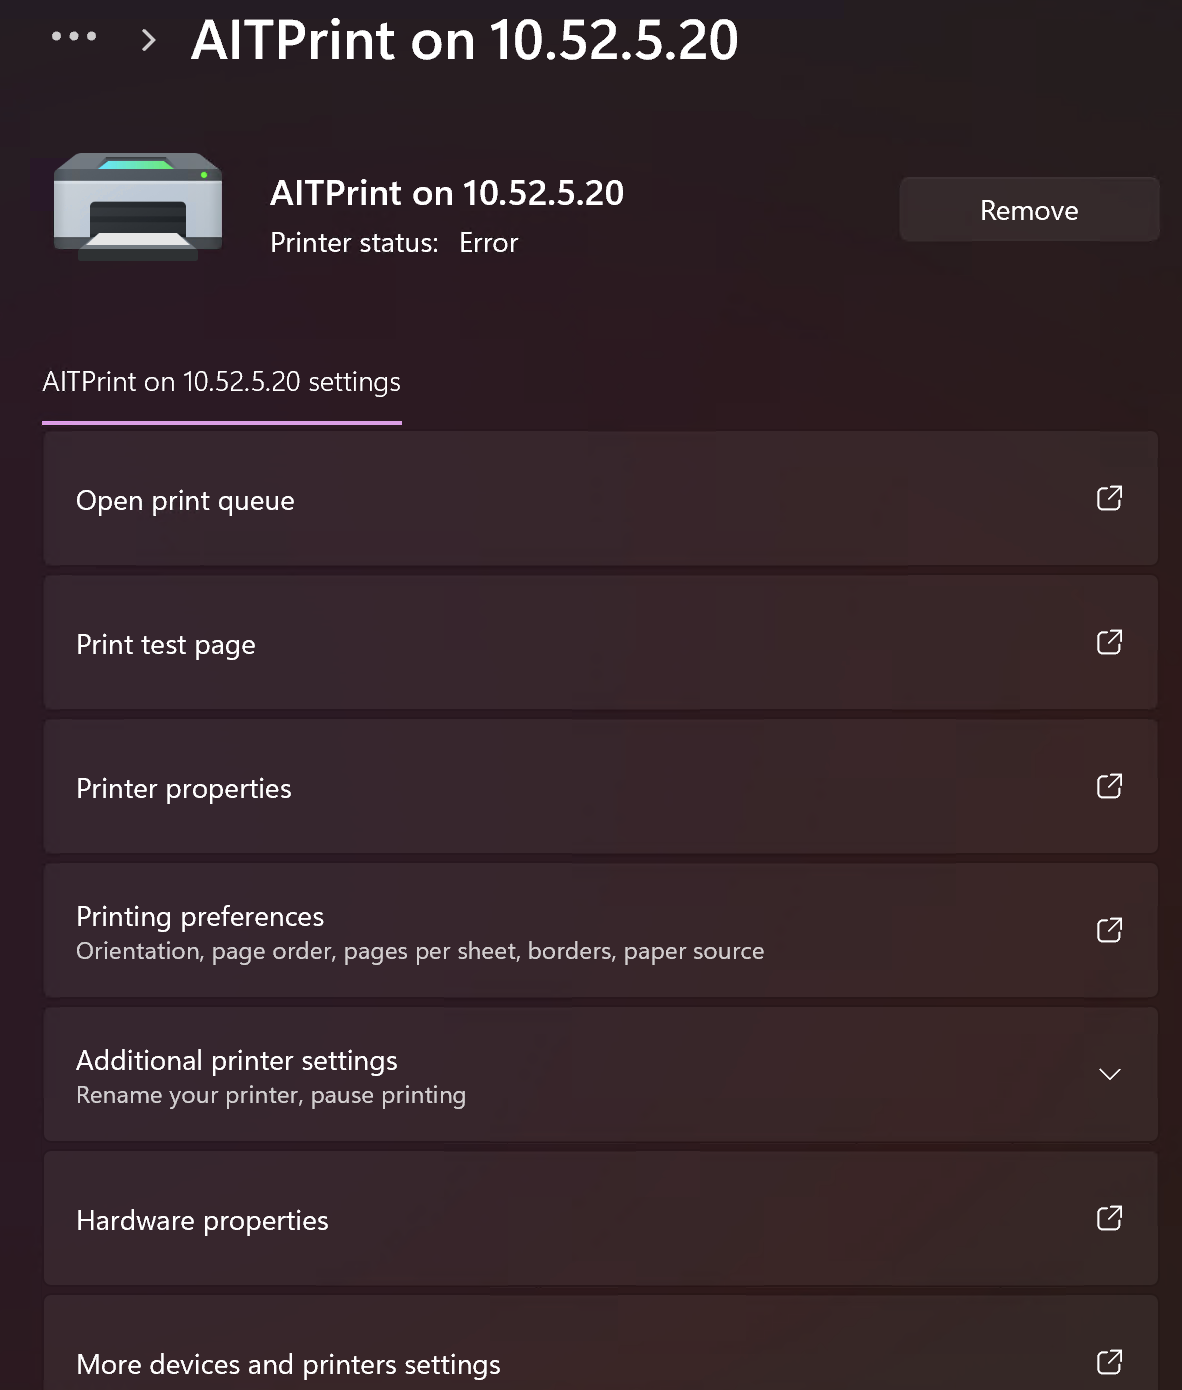
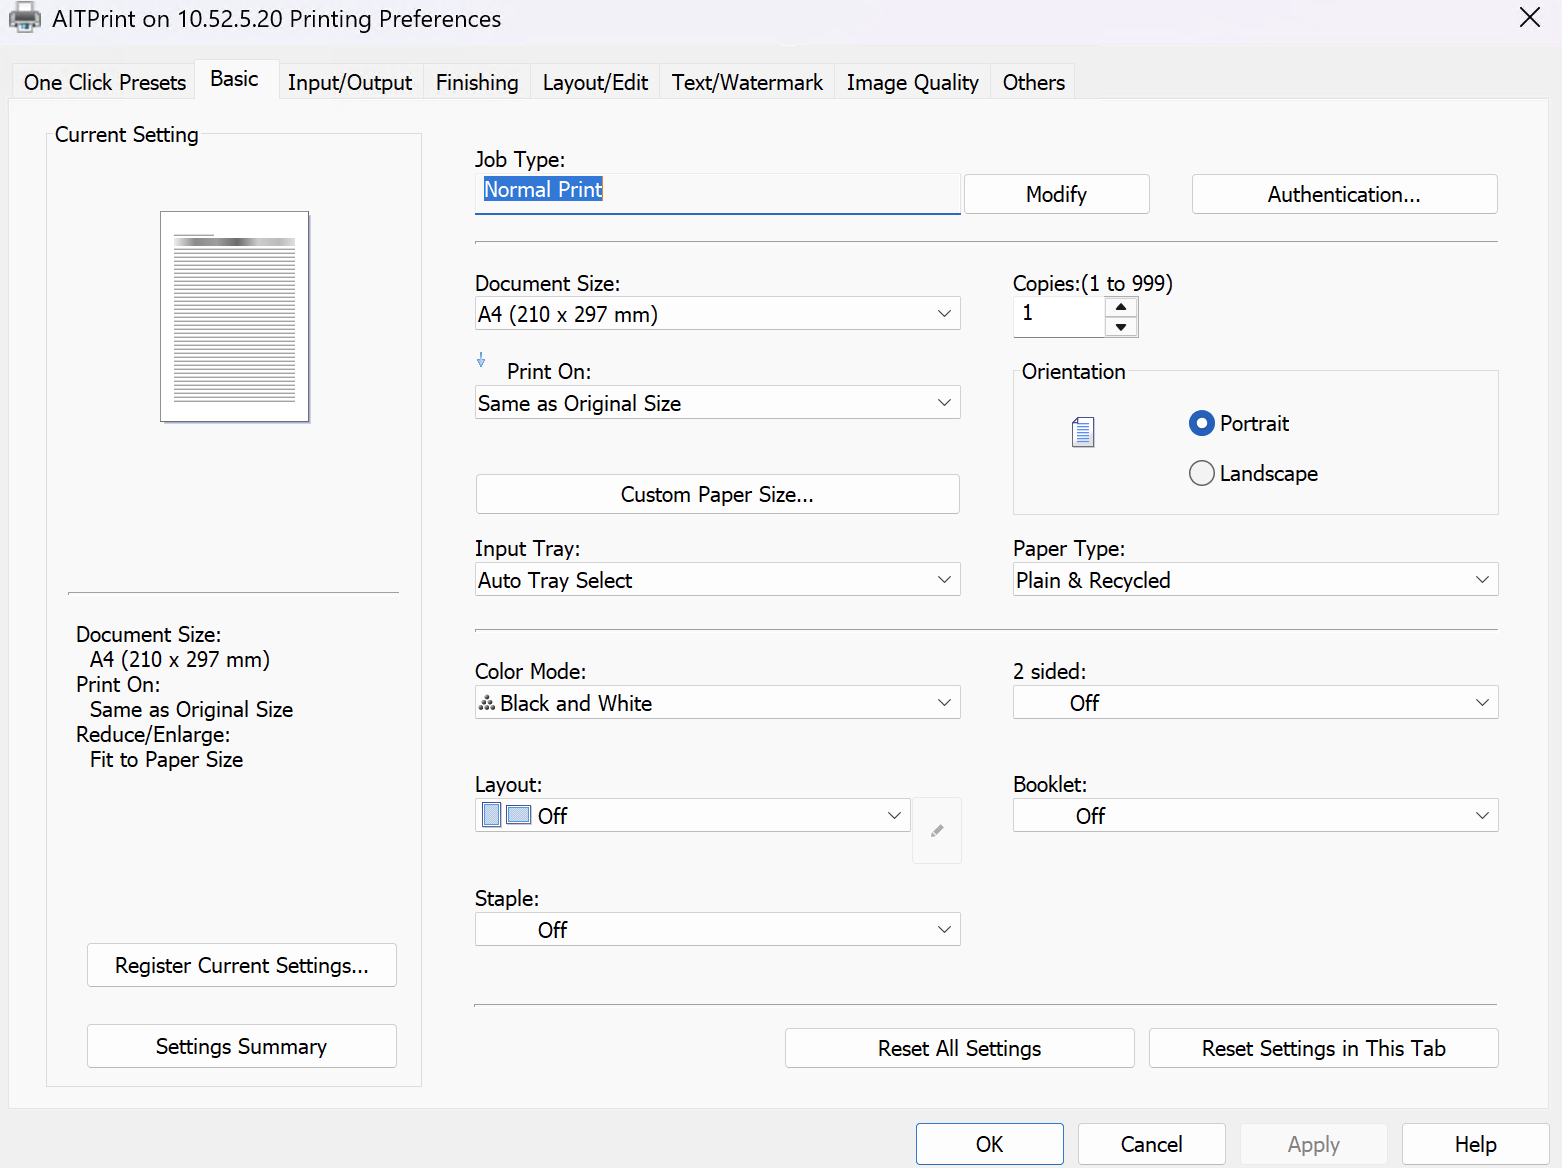
2. Click Add device> wait then Click Add a new device manually > select a shared printer by name > enter : \\10.52.5.20\AITPrint then Next (If it's popup for user&password go for 1234 both user&ps)> wait until successfully >then go AITPrint on 10.52.5.20 Printing preferences... > On Basic tap Click Authentication > enter login User Name: your_account_name

Installing the software on Windows
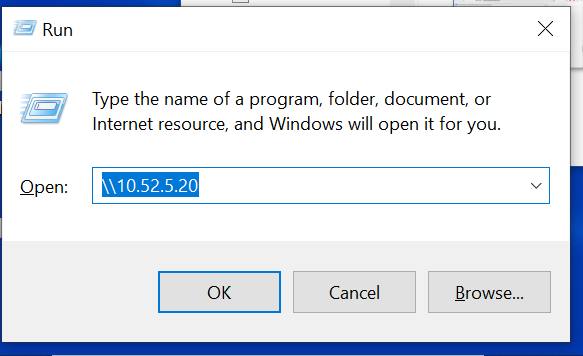
| 1. | Search for Run (or type ⊞ Win+R) to launch a command. |
 |
| 2. | Type \\10.52.5.20 to access the print server. |
 |
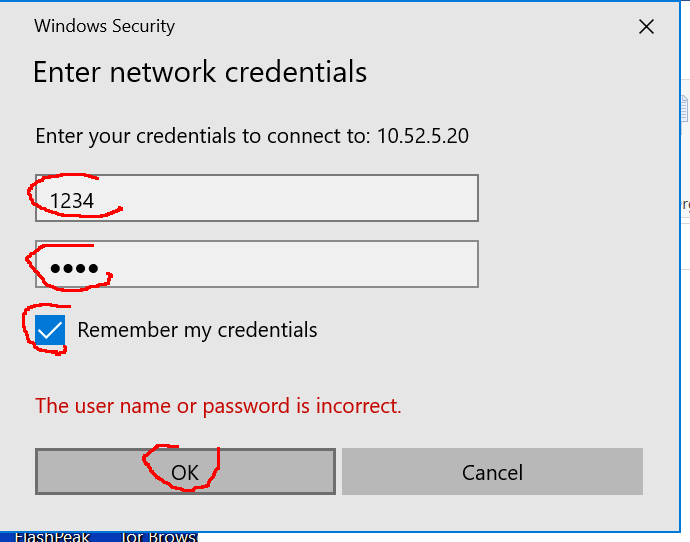
| 3. | Enter the username 1234 and the password 1234.Select Remember my credentialsAnd click OK.Note: the username and password are the four digits 1234, not your own username or password. |
 |
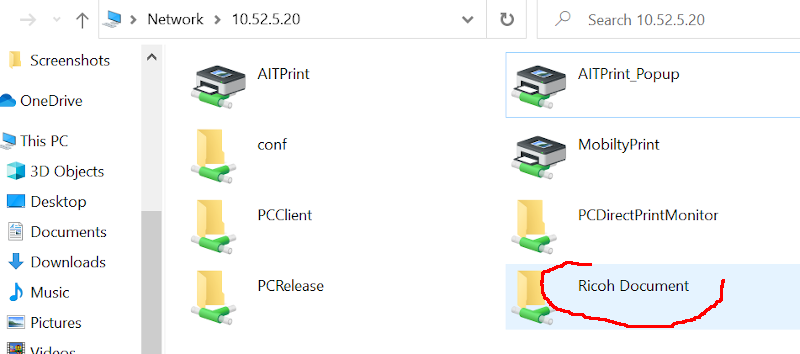
| 4. | Double click on the folder Ricoh Document. |
 |
| 5. | Double click on MapPrinter student popup to launch the installer. |
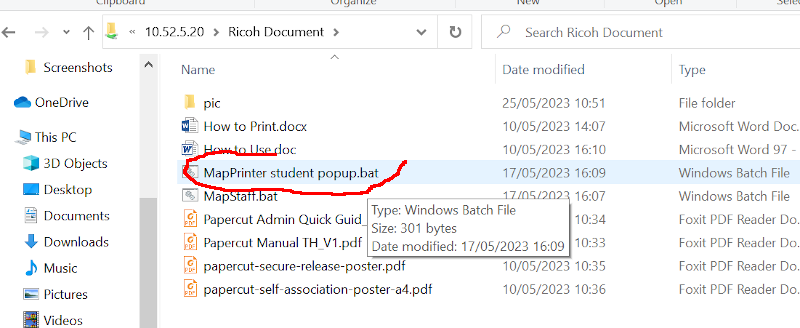 |
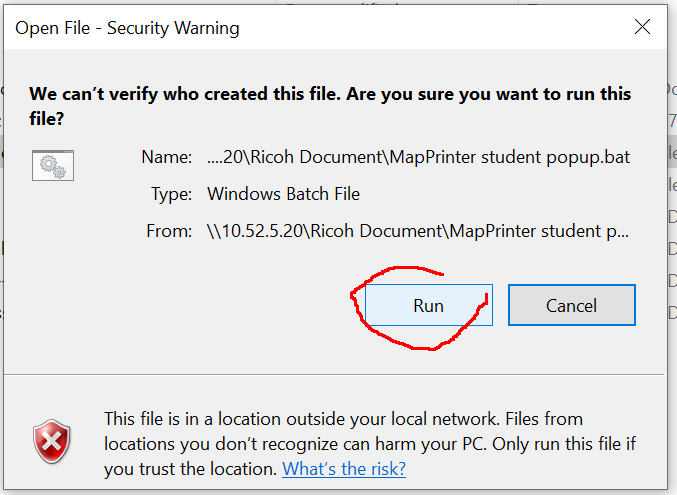
| 6. | Click on Run to accept the installation of the software. A new printer will be added to your computer. |
 |
| 7. | Configure the new printer AITPrint_Popup on 10.52.5.20Right click on the printer and select Printing preferences |
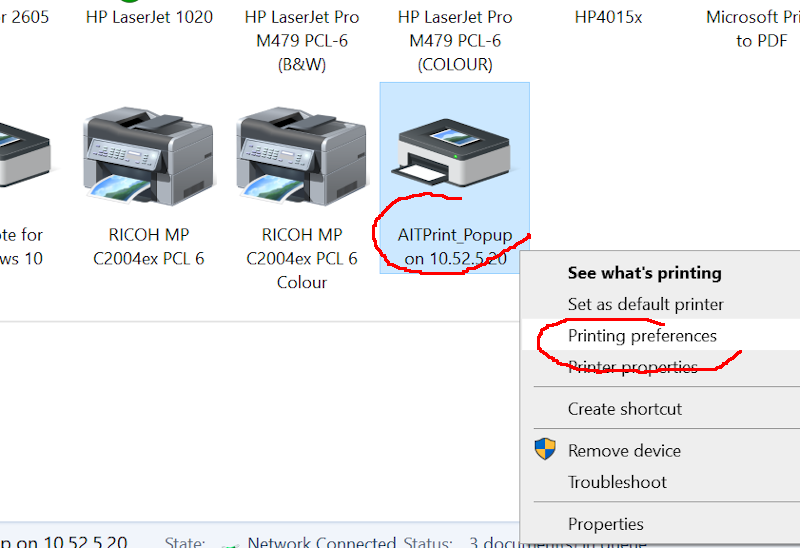 |
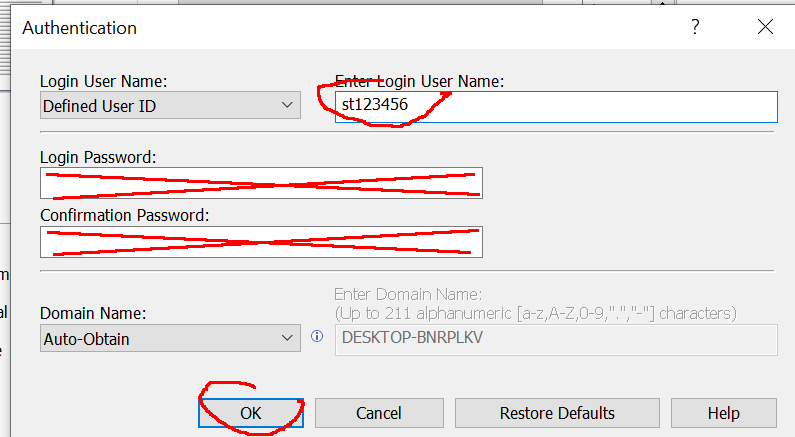
| 8. | Click on Authentication... | 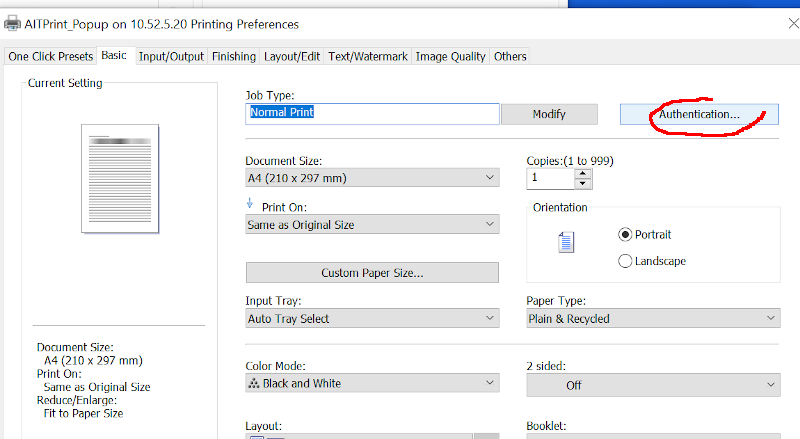 |
| 9. | Type you AIT account name in Enter Login User Name:For students it will be something like st123456.Do not enter your password. Click OK and close all the windows. |
 |
Printing
Use the printer AITPrint_Popup on 10.52.5.20 like any other printer on Windows.
Each time you print a document, the Authentication popup will show, like on point 9, above, just click OK.
You print job has been queued and now you can go to a printer to do the physical printing.
Using your AIT ID card
The first time you print a document, you can register your AIT ID card with the system. Once your card is registered, you will only have to wave your card at one of the printer to collect your documents.
Note: Only use your personal, actual AIT ID card, do not use the card of a friend, do not use the card from last year, do not use the card of your condo or your ATM card. The system does not check the card, but it will in the future.
If you are issued a new card, swipe it on a printer and proceed to associate it to your account. You can only have one card associated to your name at any given time.
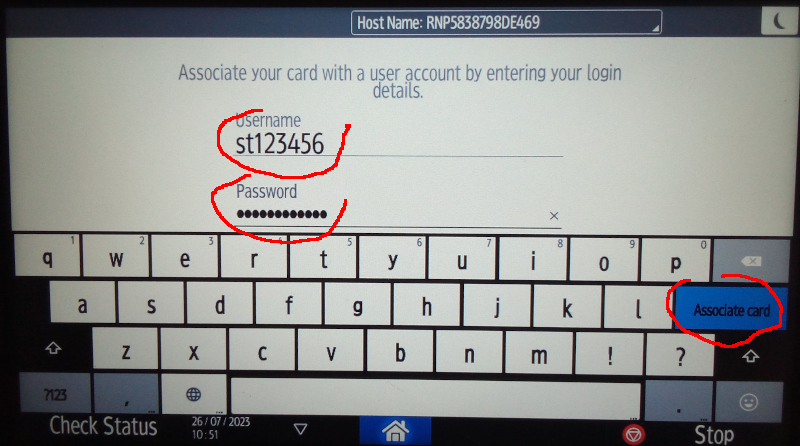
| 1. | Insert your AIT ID card in the card reader of one printer. The card reader is located on the right, under the control panel of the printer. |
 |
| 2. | If the system has never seen that card before, you must authenticate. to associate the card to your name. Use your AIT username st123456 and AIT password.Click on Associate card.Your card is saved in the system. |
 |
| 3. | The system display the list of pending jobs. Click on Print release.Do not forget to Log out when you are done printing. |
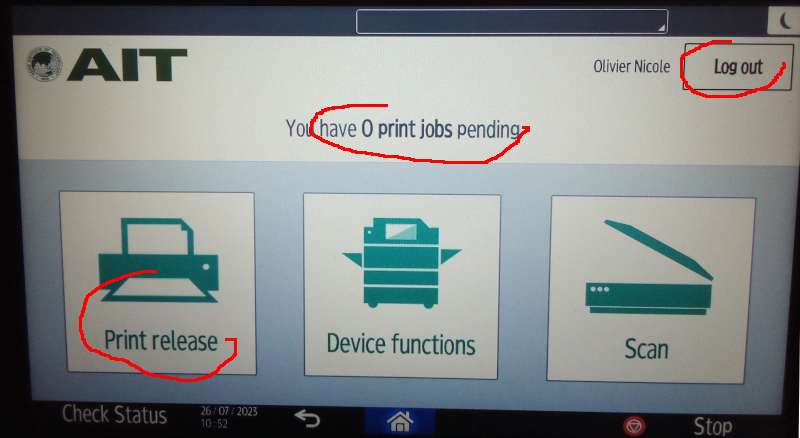 |
| 4. | Next time you need to print, just swipe your card on any printer and you will be redirected to step 3. automatically. |
Installing the printer for Linux
It should also work for any other flavour of Unix.
To use the printers disseminated in AIT, you need to add a new printer to your computer, with the following settings:
Network printerLPD/LPR Host or PrinterHostst123456@10.52.5.20- Note: It is very important that you use your AIT username in front of the host IP address. On your laptop, you have a username that is not your AIT student ID, maybe you use your first name or your nick name... This name is unknown in AIT systems, so you must indicate that you will be printing using that specific AIT username.
- Anyone printing with your laptop will be using your account and your quota.
QueueAITPrint- Be careful to use the proper upper and lower cases.
MakesRicohModelIM C2000DriverRicoh IM C2000 PS [en](recommended)
Note: do not print a test page, on Linux it prints a two sided colour page, that will count for 20 pages on your quota.
Using your AIT ID card to release the print jobs is the same as for Windows users above
Installing the printer for MacOS
- Method: Open Print Center > Choose Printer > Add Printer.
- The Secret: In the Add Printer window, hold down the Option key and click the Default icon, or right-click in the toolbar and select Customize Toolbar to add the Advanced (Gear icon) button.
- Options: This allows setting up manual IP printing, choosing specific protocols (LPD, HP Jetdirect, IPP), and selecting specific driver models.
2. open +(add printer) go advanced tap > select Type: LPD > enter > lpd://

Note: do not print a test page, on Linux it prints a two sided colour page, that will count for 20 pages on your quota.
Using your AIT ID card to release the print jobs is the same as for Windows users above
- Details
- Category: Uncategorised
We have three servers that running JupyterHub: puffer.cs.ait.ac.th, gourami.cs.ait.ac.th and guppy.cs.ait.ac.th. See the hardware configuration at the bottom of this page.
Using JupyterHub
Any user of CSIM and DSAI can access any of these servers through a JupyterHub interface to run Python notebooks.
contact
Hardware of the servers
puffer |
32 x CPU, 256GB memory, 4 x NVIDIA GeForce RTX 2080 Ti |
gourami |
8 x CPU, 32 GB memory, 2 x NVIDIA GeForce GTX 1080 Ti |
guppy |
8 x CPU, 32GB memory, 2 x NVIDIA GeForce GTX 1080 Ti |
| Powered by: |
- Details
- Category: Uncategorised
Network Access Gateway at CSIM is based on ZeroShell.
Use the following URL
With the new firewall, the IP address has changed, please use the following URL:
and update your bookmark.
Network Access
The Computer Crime Act B.E. 2550 of Thailand requires that any person access Internet is properly identified. In order to fulfill this requirement, you must authenticate to the network access gateway before you can access any Internet resource outside of AIT (inside AIT is any IP addresses 192.41.170/24 and 203.159/18, AIT web site is hosted in the cloud and therefore is outside of AIT).
Authentication is performed on the web; the first time you access an external web page from a given computer, you are presented with the gateway page:
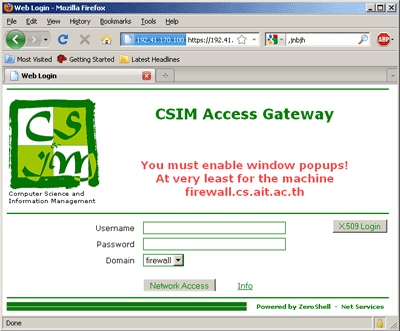
You should use your CSIM account and password to authenticate. Alternatively, you can click on the X509 Login button.
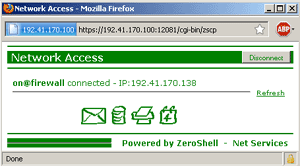
Once authenticated, a pop-up window will open. You must allow this pop-up window as it will maintain your computer authenticated to the gateway. If the pop-up window dies for any reason, the authentication will automatically expire within less than 10 minutes.
Once authenticated, you can access any Internet resource. The authentication will remain as long as the pop-up window is alive.
Every ten minutes, the pop-up will send authentication renewal message to the access gateway; in case the gateway does not receive a renewal message, the connection dies; this prevents the next user to steal an open connection associated to a given IP address.
X509 Login
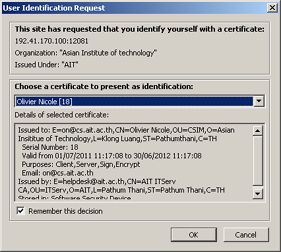
As an alternative to username and password, you can use a X509 identity to login. X509 login is easier and simpler: once configured, you only need to click on the button. This proves very useful in the case of mobile devices like smartphones.
An X509 identity associates a public key (from a private/public encryption system) and the identity of the owner of the key: I hereby certify that this key 56ABG-YUT54-8WSHU7-IYI77 belongs to Mr Olivier Nicole from AIT/CSIM. That X509 identity is then recognized by our firewall.
You can either create your X509 automatically or you can create it manually.
Security wise, X509 certificates are not flawless, but in the case of authentication for network access gateway, it is acceptable. It also means that your CSIM password is not stored in your computer; anyone accessing your computer will not be able to steal your CSIM password. But anyone who access your account on your computer will still be able to access Internet under your name.
Create your X509 automatically
Simply go to CSIM account management page and fill in the password for X509 identity. The Certificate will be sent to you by email in your CSIM mailbox. This is fast and easy.
You can download the file from your email and install your X509 identity. The X509 identity is valid for one year.
Installing your X509 identity
On Windows, you can simply double-click on the file. Once you have entered the password you choose above, you can click on Next at every step. The X509 identity will be automatically installed in your Personal certificates. Once installed, your X509 identity will be available for any web browser you use.
On Linux, you need to install your X509 identity in your web browser. Open the Settings for your browser and search for Certificates. Then import the file in Your Certificates. You will need to repeat the same operation with all the web browsers that you are using.
You can use your X509 identity on more than one system.
Note: If you do not delete your X509 identity file right after installing it, remember to protect it against theft.
Using your X509 identity
On the CSIM access gateway page, simply click on the X509 button.
When you use the X509 identity for the first time, your browser will ask you to choose which identity to use; for example with Firefox:
Create your X509 identity manually
Creating your X509 identity manually require many steps, but you keep a full control on the process. You also retain the full rights on your private key.
There are many ways to create your X509 identity; the method below works on most of the Unix systems (alternatively you can run the commands below inside an MS-DOS windows on a Microsoft system, after you have installed OpenSSL for Windows from Shining Light Productions, available locally from \\banyan\application\WINAPPS\OpenSSL\Win64OpenSSL-3_1_1.exe):
- Generate a my.key that contains your RSA public/private key:
It will ask you to enter a password for your secret key. You will have to type the password twice.openssl genrsa -des3 -out my.key 2048
Make very sure to store the file my.key in a safe place. - For security, change the mode of the file my.key, so that only you can read it:
chmod 400 my.key - Generate a certificate request:
And answer the questions:openssl req -new -sha256 -key my.key -out my.csr
Use your full name and email address at CSIM.You are about to be asked to enter information that will be incorporated into your certificate request. What you are about to enter is what is called a Distinguished Name or a DN. There are quite a few fields but you can leave some blank. For some fields there will be a default value, If you enter '.', the field will be left blank. ----- Country Name (2 letter code) [AU]:TH State or Province Name (full name) [Some-State]:Pathumthani Locality Name (eg, city) []:Klong Luang Organization Name (eg, company) [Internet Widgits Pty Ltd]:AIT Organizational Unit Name (eg, section) []:CSIM Common Name (eg, YOUR name) []:Olivier Nicole Email Address []:on@cs.ait.ac.thPlease enter the following 'extra' attributes to be sent with your certificate request A challenge password []: An optional company name []: - Send the file my.csr to
This email address is being protected from spambots. You need JavaScript enabled to view it. (This email address is being protected from spambots. You need JavaScript enabled to view it. ), for certification. I must be able to verify your identity, use CSIM or AIT email to send the file. If I cannot asses your identify, I will not issue the certificate.
Note: the file my.csr is a plain text file, you can copy/paste it to your mail, no need to attach it. - Within a couple of days, I will send you a reply that contains your X509 certificate file. Save it under the name my.crt.
- Your certificate is generated by CSIM, using CSIM Certification Authority file. You need to download this file before you proceed to the next step; save it under the name cs.ait.ac.th.ca.
- Generate a PKCS12 file for X509 identity:
Use your full name.openssl pkcs12 -export -inkey my.key -in my.crt -certfile cs.ait.ac.th.ca -out my.p12 -name "Olivier Nicole"
Note: the "quotes" around the name.
It will ask you for you password for the secret key (as in 1) and to choose and enter a PKSC12 password. The PKSC12 password can be different from the passowrd for the secret key. - Change the mode of the file my.p12 for safety; the file
my.p12contains a copy of your private key, keep it as secured as your private key:
chmod 400 my.p12
- Install your X509 identity as described above.
| Powered by: |
- Details
- Category: Uncategorised
Based upon DNS graph by Nathan Campi
In his scripts for graphing DNS activity, Nathan is proposing a workaround for Bind 9.The need for a workaround arises because with Bind 8 the statistics kept by named used to include the number of queries received by the server for each type of query, it was easy to retreive the data from the statistics of named to draw the graph; whileBind 9 do not collect such data anymore, they should be collected by logging all the queries and calculating statistics.
Nathan proposes to log the queries to stderr and run named though a shell script; the script will read from stderr.
I don't like that solution because:
- named is not started in the regular fashion, that could cause incompatibilities when system is upgraded (many system upgrade cause named upgrade);
- named would fail in case the sheel script fails;
While at same time, named knows how to log the queries to a separate file and it includes builtin a mechanism to rotate the file when it reaches a certain size a Perl module like File::Tail knows how to read from a file that get rotated like syslog files or this named quey log file.
The solution I propose decribed bellow.
Log the queries to a file
Configure Bind 9 to log all the queries to a file. In the example bellow, the file is called query-log, it rotates everytime the file grows over 1 MB and named keeps up to three backup versions of the file.
|
|
There will be up to four files created in named default directory, query-log, query-log.0, query-log.1 and query-log.2. The file that contains the most recent queries is query-log.
Examine the log file and collect statistics
The following Perl script uses the module File::Tail to read the file event when it rotates, it computes the number of queries by type.
The script saves its own PID in the file $pidfile. Upon receiving a hang-up signal, it writes the statistics in the file $dumpfile. The $log_wait_interval is used by File::Tail to set the tick clock when the Perl script should become active and try to read new entries in the log file.
This script should loop indefinitely, it should be launch at boot time (use your prefered method to launch that script).
#!/usr/local/bin/perl |
The display-bindstats.pl script
It corresponds to the script use for Bind 8 on Nathan's page. But to collect the statistics, it only has to send an hang-up signal to the script above and read the data from the file as designed in $dumpfile.
#!/bin/sh |
This script is called by SNMP in the exact way defined on Nathan's page for Bind 8.
Integration with SMF under Solaris
The following modification has been suggested to me by Robert Jansen from Brussels University:
To have this e.g. integrated under SMF under Solaris, one can define the |