
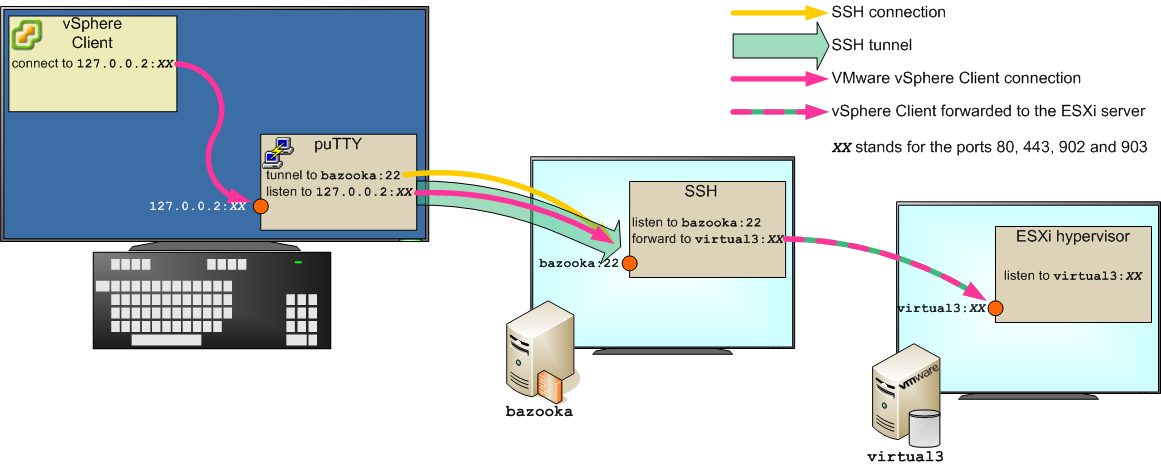
VMware server web page cannot be accessed from outside of CSIM because of the restrictions on the firewall. These restrictions can be bypassed by configuring SSH tunnels.
The following example will use puTTY as SSH client. For non-Windows system, see below.
The first step is to install the software and make sure it is working, puTTY (or other SSH client) must be used to connect to bazooka.cs.ait.ac.th from outside CSIM.
Configuring puTTY for SSH tunnel
VMware needs four tunnels on TCP ports 80, 443, 902 and 903. In the following steps, we will use the IP 127.0.0.2 as a replacement for localhost.
Port 443 is used by all the web traffic traffic between you rbrowser and the VMware server web page. Port 902 is used when you open the console of your virtual machine. Port 80 is used to a a page with an error. I have not ye seen the use of port 903 but it was documented elsewhere. Traffic to port 902 is mostly VNC.
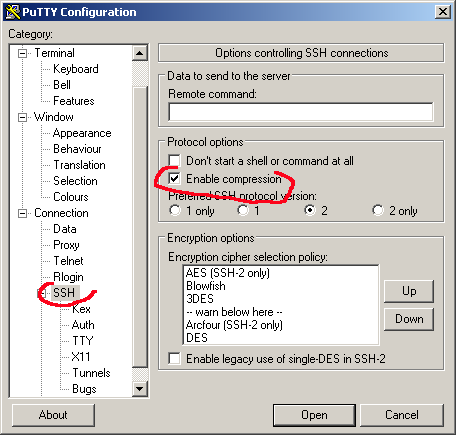
| 1. | Start puTTY. Enable compression: because you may access your virtual machine in graphical mode, it will generate a large amount of traffic, hence, compression is highly recommended. Compression is configurable under the option SSH. |
 |
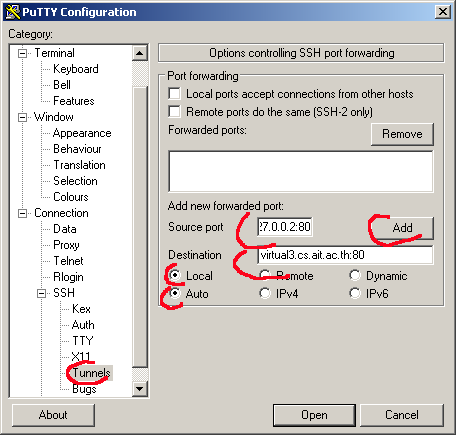
| 2. | Create the tunnel: the example correspond to the tunnel for TCP port 80. Go to the option SSH/Tunnels and add a new forwarded port from source port 127.0.0.2:80 to destinationvirtual3.cs.ait.ac.th:80 The option local and auto should be selected by default. Note that the field to enter the source port is too short but you should enter the full 127.0.0.2:80 Click on add. |
 |
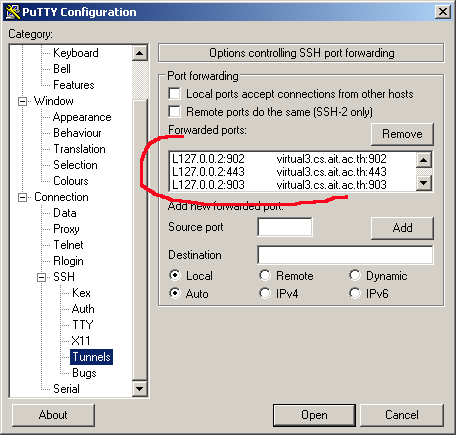
| 3. | Reapeat the operation above, adding forwarded ports for TCP ports 443, 902 and 903. At the end, you should have the list of forwarded ports given in the image: L127.0.0.2:80 virtual3.cs.ait.ac.th:80 L127.0.0.2:443 virtual3.cs.ait.ac.th:443 L127.0.0.2:902 virtual3.cs.ait.ac.th:902 L127.0.0.2:903 virtual3.cs.ait.ac.th:903 Note that the window can only show three ports while you have forwarded four. Use the scrollbar to check all ports are thete. |
 |
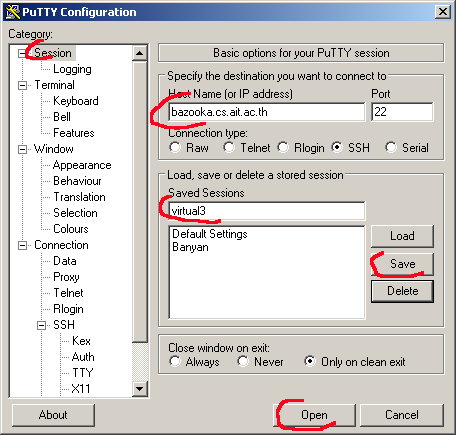
| 4. | Go to the session option at the very top and specify the destination where you connect to by entering bazooka.cs.ait.ac.th in the host name field. Give a name to the session and save it: you will be able to reuse it later on. You can then open the connection. Later you will be able to open the session you have saved and proceed on, starting from step 5 below. |
 |
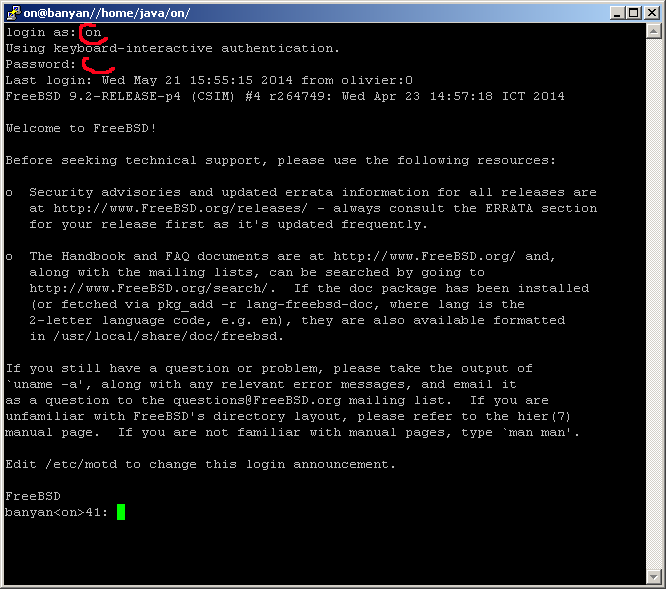
| 5. | Enter your CSIM username and password. You are connected to bazooka.cs.ait.ac.th and the SSH tunnels are created: your local machine at 127.0.0.2 appears like a VMware ESXi server, but all the traffic will be sent to bazooka through the tunnel and bazooka will send that traffic to the real VMware ESXi server virtual3.cs.ait.ac.th. |
 |
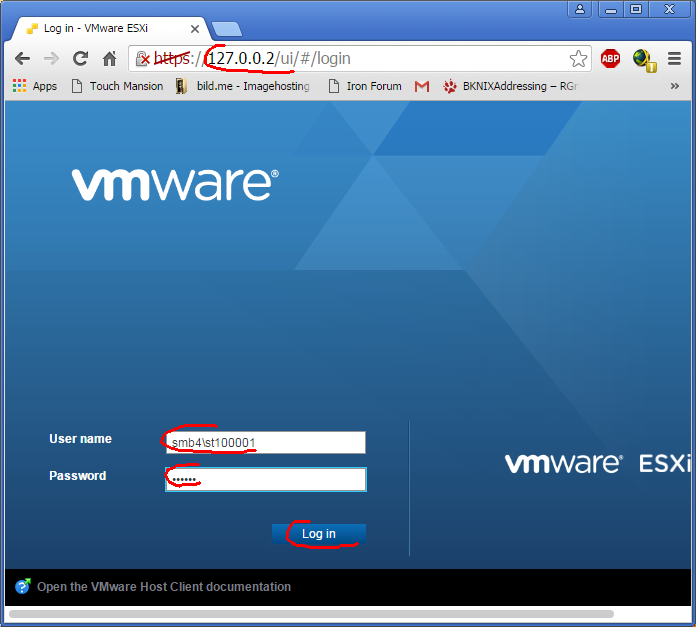
| 6. | Launch a web browser and connect to the server at https://127.0.0.2/Use the username and password as you would use them in CSIM and work normally. |
 |
SSH tunnels for non-Windows systems
On Linux, you can use ssh to establish the tunnel needed to run vmplayer across CSIM firewall.
Note that because it uses system ports, you need to be root to run the following command.
sudo ssh -N -f -L443:virtual3.cs.ait.ac.th:443 -L902:virtual3.cs.ait.ac.th:902 <your account>@bazooka.cs.ait.ac.th
Note: the comamnd has to be run with sudo as it needs to configure some priviledge ports (under 1024) that are reserved for super-user.
Then you can run vmplayer -H localhost.
| Powered by: | puTTY |
|